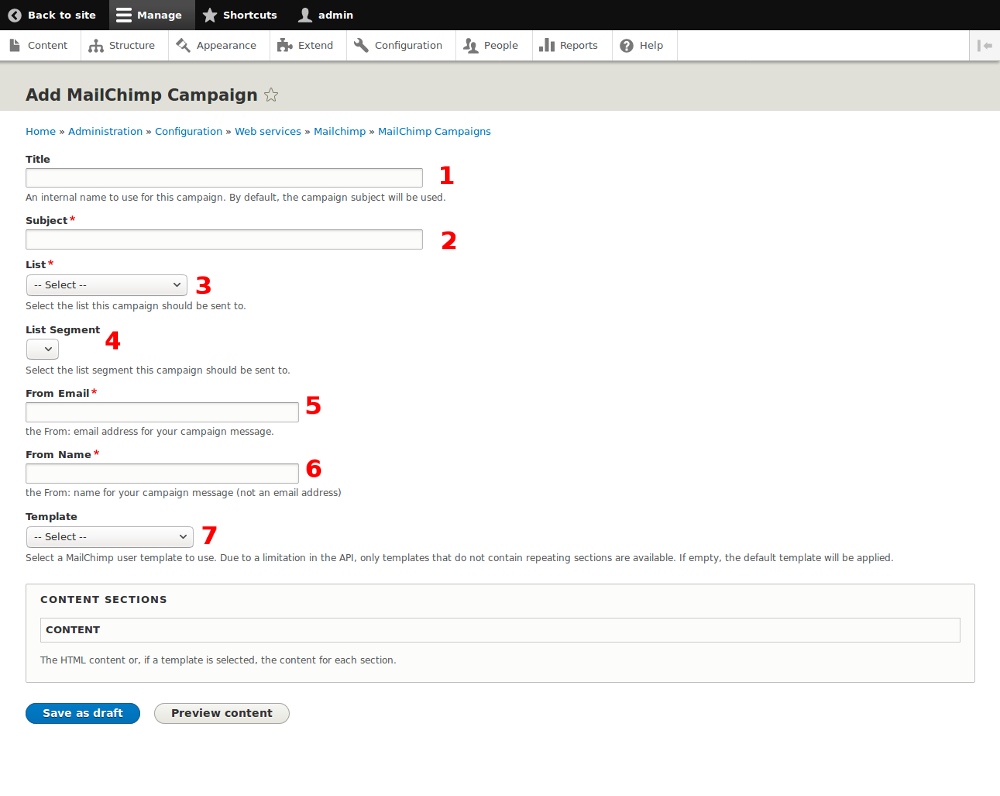
Your website has been set up to allow you to compose and send your MailChimp email campaign from within the administration section of your website. This simplifies the process and allows you to put together your email campaign quicker..
Here is how you do it.
Go to your website, then:
-
Log in, then choose Shortcuts
-
Choose MailChimp
-
Now choose the “Campaigns” tab
-
Choose Add MailChimp Campaign
Add MailChimp Campaign
-
Give your campaign a “title”. This is an internal name, and if not used, the subject name is added automatically.
-
“Subject” This is the name of your campaign that the public will see.
-
“List” is the email list you are using on your Campaign. If you have more that one list, going to different people, the drop down menu will allow you to select the correct list.
-
The List segment can be ignored
-
“From Email” will have the email that was set up in MailChimp
-
“From Name” will state the name of your group.
-
“Template” Use the drop down menu to find the correct template. If you have a customized template, select it here.
Content Selections
-
Click on “Body” here you can type in your text message, which will appear in the body of your newsletter.
-
Suppose you also want to insert some content from the website, into the newsletter. This is made very simple. Start by choosing “Insert Site Content”.
-
“Entity Type”, choose Content
-
Under “Entity Title” start typing the title of one of your website pages. For instance, you may want to insert an upcoming event. As you begin to writ the title, the website will insert the full tiltle automatically.
-
Under “View Mode” choose how you would like toe content to be displayed. Choose “teaser” and the newsletter will display a short message with a link to bring people onto the website to read the full content. This gives them a chance to look around the site and discover other things. You may also choose “full content” and the whole event will be displayed in your newsletter..
-
If there is another entity tititle to be entered, insert a comma and type the new title. It will then apepar for you, and insert it into the newsletter.
-
Now “save as draft”
-
Your campaign will then be displayed.
-
From there, under “actions” you can view your newsletter. When satisfied, you can choose send, and the newsletter is on it's way!

